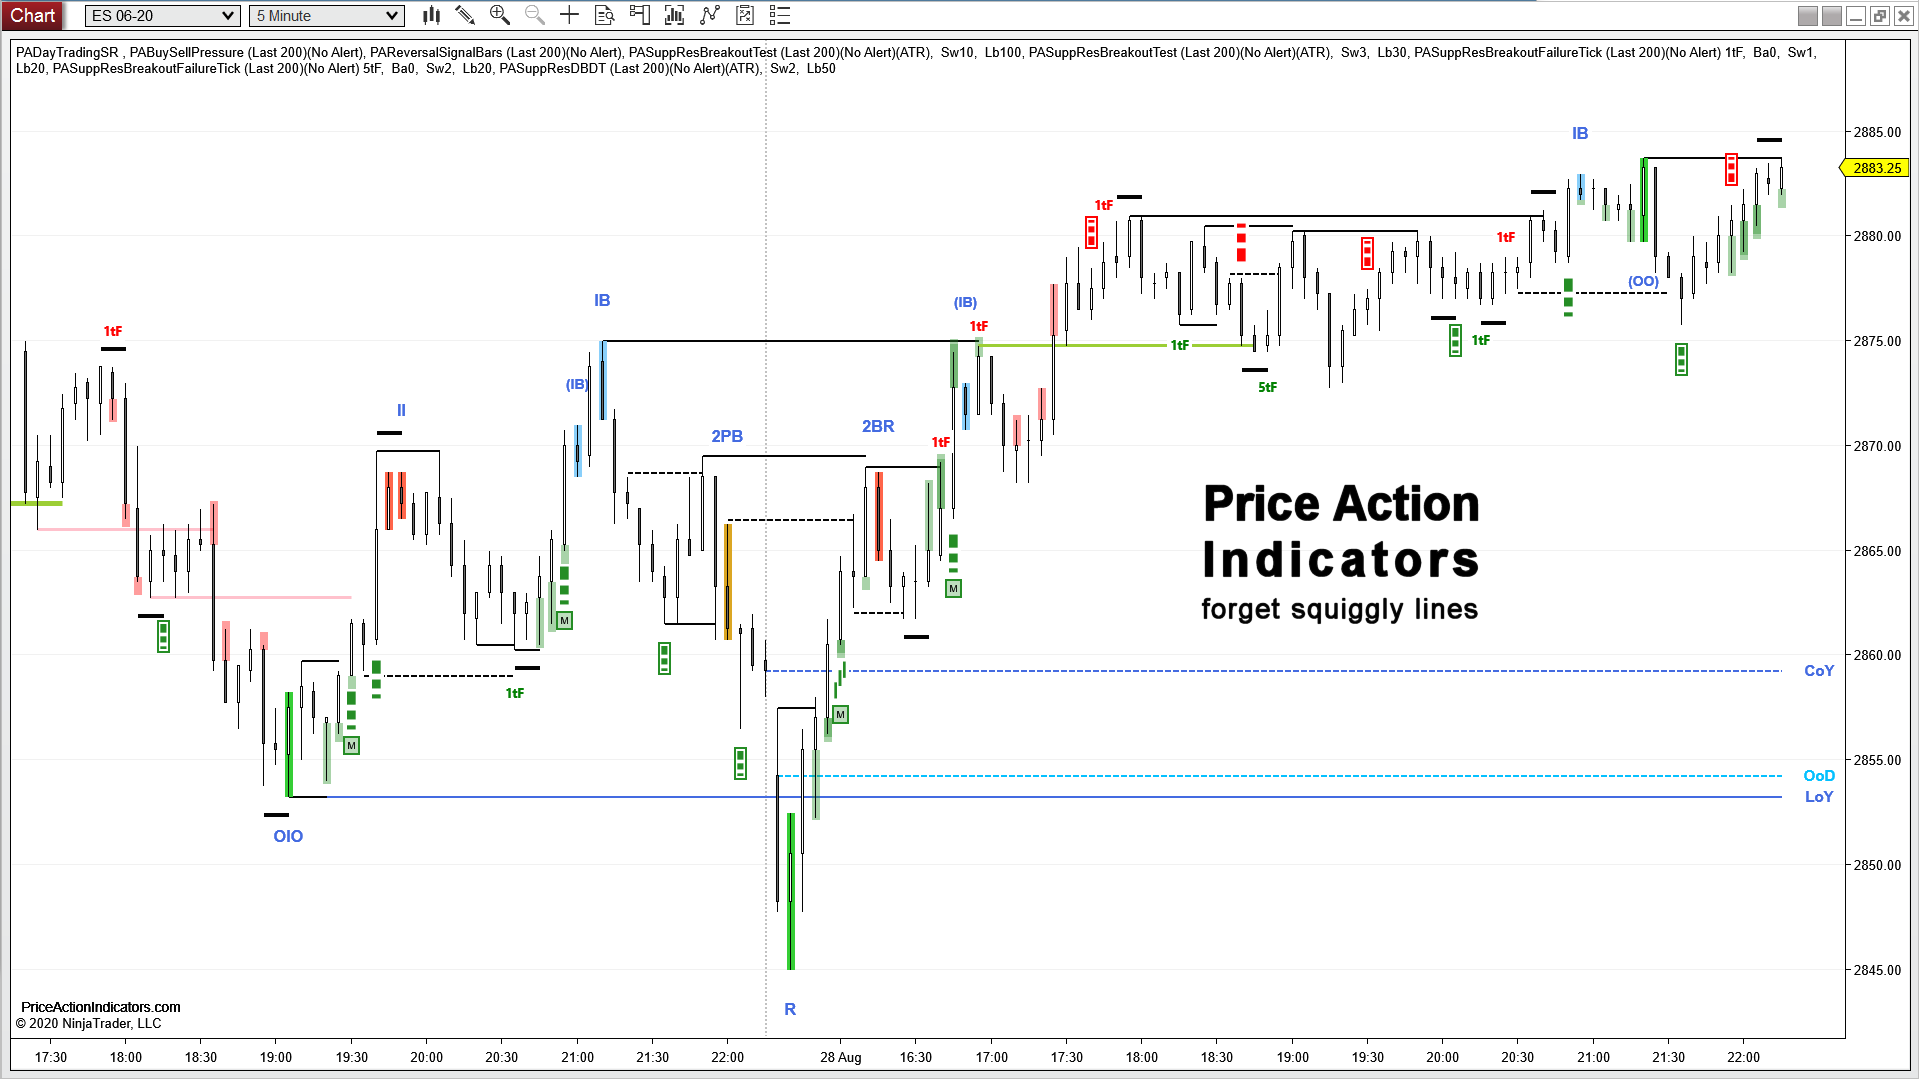
I draw all trend lines, arrows and boxed text (entries) by hand.
I mostly take the trades, that are marked with the arrows. During lunch or in the afternoon, they often represent reads only.
Expanding triangles I usually mark with purple diamonds.
Sometimes (if they aren’t obvious) I mark wedges, fH2 or fL2 with dots (for each push/failure).
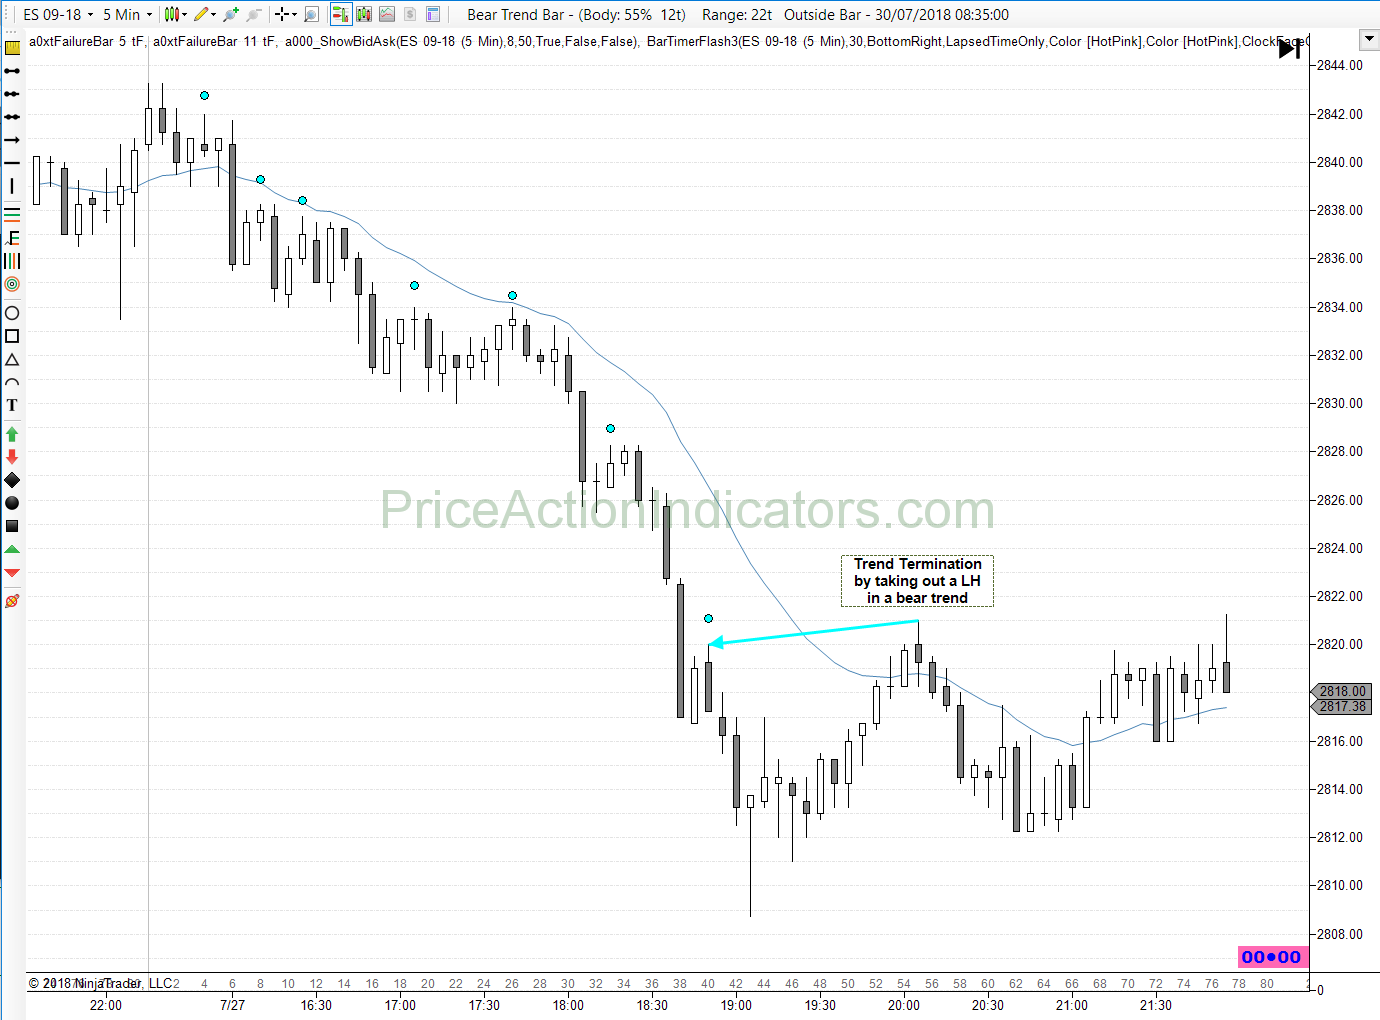
The cyan colored arrows (drawn by hand) show trend terminations, by taking out a HL in a bull or a LH in a bear. In channels a trend termination needs to take out two HLs for a bull channel and vice versa for bear.
The abbreviations/lingo I use is a mixture of Nine Transitions (Cad) and Al Brooks.
On the daily chart I mark the Always In direction, that I see the market is in.
AIL = Always In Long (look to get long)
AIS = Always In Short (look to get short)
Support and Resistance
To show all basic Support and Resistance you can use the Day Trading Support/Resistance indicator for NinjaTrader 7/8. It’s free.
Add the shallowest Trend Lines from the prior day and you’re set. Read more here: Yesterday’s shallowest trend lines, be sure to draw them. It’s free too.
HOY = High of Yesterday
LOY = Low of Yesterday
COY = Close of Yesterday
OOY = Open of Yesterday
OOD = Open of the Day
OOW = Open of the Week (especially useful on Friday’s)
ATH = All Time High
gap = Gaps from prior days
- Trend lines
- Trend Channel Lines
- Measured Moves
- Swing Highs/Lows
- Highs/Lows of Signal Bars
- Highs/Lows of Entry Bars
- Highs/Lows of Trading Range Bars
The Open
Continuation = Price action is continuing from the prior day with a small or no gap
Bull gap = Price opens with a gap higher than the prior day’s close
Bear gap = Price opens with a gap lower than the prior day’s close
Mid range = Open within the prior day’s range or close to HOY or LOY
OR = Opening Range
More on Opening Range
Trend
TA = Trend Attempt, a strong breakout with a breakout bar closing beyond the breakout point
Spike = a very strong trend/breakout, consecutive Trend Bars
HL = Higher Low
HH = Higher High
LH = Lower High
LL = Lower Low
TL = Trend Line, How I draw Trend Lines
mTL= micro Trend Line, connect the lows of two consecutive bars for a bull mTL (see here)
TCL = Trend Channel Line
TCLOS = Trend Channel Line Overshoot
T1B = Trend from the 1st bar of the day or so
1P = 1st Pullback after a trend attempt
1Tail = 1st Tail, kinda 1P (lmt C buy/sell) in a spike/hard trend
H1/L1 = One push pullback in a bull/bear move and a stop entry buy/sell above/below the prior bar
H2/L2 = Two push pullback in a bull/bear move and a stop entry buy/sell above/below the prior bar
2SP = 2nd shallow PB in a strong trend, like the 2nd L1 in a strong bear trend
mW = micro Wedge, a wedge formed by only a couple of bars, especially Inside Bars
mDT/mDB = micro Double Top/Bottom, two or three consecutive bars with the same high/low
TRI = Triangle, a couple of swings with contracting range
BP TRI = Breakout PB from a Triangle
MM = measured move(s) are often used for profit taking, e.g. buy the breakout of a trading range and take profits at 1 x the high of it (or MM of a PB, TRI or spike), see here
L1=L2 measured move = the 1st and 2nd leg of a trend (measured from the extreme of the Pullback) have the same size
Channel (CH)
In a Channel prices are moving in the same direction but most bars are overlapped
MC = Micro Channel, consecutive bars, without a pullback
1IB = 1st Inside Bar signals the continuation of the Channel
1TL = 1st strong counter trend bar closing at or near the trend line of the channel (Buy/Sell lmt C)
CXT = kinda expanding triangle, a pullback in a CH, that takes out a minor LH/HL, examples see here
1CHBO = fade the 1st breakout of a channel, examples see here
SC = Spike & Channel
Trading Range (TR)
BW = Barb Wire, a special kind of trading range where the price action is confined to a narrow range made of small bars, many of which are dojis
BO = BreakOut
1fBO = 1st failed Breakout of the Opening Range
2fBO = 2nd failed Breakout of the Opening Range
1fB1 = a large bar 1 at support/resistance is a TR and 1fB1 is the fBO of that
XT = Expanding Triangle
fBO = failed Breakout (E.g. fBO LOY = Failed Breakout of the Low of Yesterday which is a good setup for going long esp when it has a good signal bar)
WfBO = Wedge failed breakout, multi-legged fBO of a TR
fH1, fH2 = Failed High 2 signifies 2 failed attempts by the Bulls to push price up. Very useful to confirm other patterns (e.g. fBO) or even trade it on its own..
fL1, fL2 = Failed Low 2 signifies 2 failed attempts by the Bears to push price down. Very useful to confirm other patterns (e.g. fBO) or even trade it on its own.
Reversal and Trend Termination (TT)
TT = Trend Termination by taking out a LH in a bear trend and vice versa for bulll ![]()
1W = 1st Wedge of the day, a 3 or 4 push pattern
W1P = 1st pullback after 1W
PW = Parabolic Wedge
FF = Final Flag signifies a sudden loss of momentum, a horizontal/overlapped pattern after a trend, a breakout often fails and tries to reverse the trend
DT, DB = Double Top, two bars with the same or almost the same high or low
DP = Double Top PullBack or Double Bottom Pullback
SHS and inverse SHS = Shoulder Head Shoulder, more see here
BX, SX = Buy Climax, Sell Climax, a very strong breakout and exhaustion, usually at the end of a trend
Doji TT = a possible Trend Termination by loss of momentum in a pullback, watch out for several consecutive dojis in a trend, it often terminates it, for examples see here
HL MTR = Higher Low Major Trend Reversal
LL MTR = Lower Low Major Trend Reversal
HH MTR = Higher High Major Trend Reversal
LH MTR = Lower High Major Trend Reversal
More information on MTR
More on Reversals
Bars and Entries
TB = Trend Bar, a with trend bar with a body >50% of the bar’s range (also smaller as part of consecutive bars)
IB = Inside Bar, the high of the bar is at or below the high of the prior bar and the low is at or above the low of the prior bar, How I look at Inside Bars
Doji = a bar with no or small body compared to it’s range
OB = Outside Bar, the high of the bar is at or above the high of the prior bar and the low is at or below the low of the prior bar, a possible reversal or continuation pattern depending on context
RVB = Reversal Bar (also Pinbar)
2BR = Two Bar Reversal, a Bear Trend Bar followed by a Bull Trend Bar, a possible bullish reversal pattern
3BR = Three Bar Reversal, a Bear Trend Bar, followed by a pause bar (e.g. a doji) and a Bull Trend Bar a possible bullish reversal pattern
II = two consecutive Inside Bars
IOI = Inside Bar, Outside Bar and Inside Bar, a possible reversal pattern
OIO = Outside Bar, Inside Bar and Outside Bar, a possible reversal pattern
OO = two consecutive Outside Bars, a possible reversal or continuation pattern depending on context
SB = Signal Bar
EB = Entry Bar
BO = Breakout (Bar), a bar or consecutive bars, that break out beyond the prior bar or range and close beyond
FT = Follow Through Bar, a bar with the same color as the breakout bar
SE = Stop Entry 1 tick above/below the Signal Bar
lmt C = buy/sell the close of the Signal Bar with a lmt order (more aggressive entry compared to stop entry)
Atm = Buy/Sell at the market (aggressive entry)
BB = Buy Below the prior bar or swing low (if you know what you’re doing 😉
SA = Sell Above the prior bar or swing high (if you know what you’re doing 😉
2E = Second Entry for an aforementioned setup
fEB = failed Entry Bar, an Entry Bar, that fails to reach a common target
BT = a Breakout Test of support or resistance (HOY, LOY), also a a H/L of a swing, H/L of a Signal Bar or H/L of an Entry Bar
1tF BT = the same as above with a small penetration of the support or resistance
OL = Overlap, Overlapped
Tick Failures
above/below possible Signal Bars (regular font)
Are breakout failures from stop entries above/below possible SBs
1 or 2 tick failures can be considered a failed breakout above/below the possible Signal Bar
5 tick and more can be considered a failure to reach a common scalp target from a stop entry above/below that possible SBs
9tO = 9 tick failure from the open of the Entry Bar (for shaved open entry bars)
fEB11t = a tick failure on the Entry Bar (EB), the bar after the Signal Bar (SB)
small yellow lines are 1 or 2 tF failed breakouts of the prior bar (e.g. Sellers above an Entry Bar)
above/below Swing Highs/Lows (bold font)
Are breakout failures of prior swing Hs/Ls, bar 1 H/L and HOY, LOY
1 or 2 tick failures can be considered a failed breakout for the breakout traders, who entered on a stop above/below that Swing H/L
5t and more can be considered a failure to reach a common scalp target for the breakout traders, who entered on a stop above/below that Swing H/L
on the E-mini 5 min chart I’m mostly looking at 1, 5, 7, 9, 11 and 13 tick failures, tick failures to reach common targets depend on the market and time frame you are trading
see also Market Types and Setups from Nine Transitions Blog
1CHBO = fade the 1st breakout of a channel
1fB1 = a large bar 1 at support/resistance is a TR and 1fB1 is the fBO of that
1fBO = 1st failed Breakout of the Opening Range
1IB = 1st Inside Bar signals the continuation of the Channel
1P = 1st Pullback after a trend attempt
1Tail = 1st Tail, kinda 1P in a strong/hard trend
1tF BT = the same as above with a small penetration of the support or resistance
1TL = 1st strong counter trend bar closing at or near the trend line of the channel (Buy/Sell lmt C)
1W = 1st Wedge of the day, a 3 or 4 push pattern
2BR = Two Bar Reversal, a Bear Trend Bar and consecutive Bull Trend Bar a possible bullish reversal pattern
2E = Second Entry for an aforementioned setup
2fBO = 2nd failed Breakout of the Opening Range
2SP = 2nd shallow PB in a strong trend, like the 2nd L1 in a strong bear trend
3BR = Three Bar Reversal, a Bear Trend Bar, followed by a pause bar (e.g. a doji) and a Bull Trend Bar a possible bullish reversal pattern
Atm = Buy/Sell at the market (aggressive entry)
BB = Buy Below the prior bar or swing low (if you know what you’re doing 😉
Bear gap = Price opens with a gap lower than the prior day’s close
BO = BreakOut
BO = Breakout (Bar), a bar or consecutive bars, that break out beyond the prior bar or range and close beyond
BT = a Breakout Test of support or resistance (HOY, LOY), also a a H/L of a swing, H/L of a Signal Bar or H/L of an Entry Bar
Bull gap = Price opens with a gap higher than the prior day’s close
BW = Barb Wire, a special kind of trading range where the price action is confined to a narrow range made of small bars, many of which are dojis
BX, SX = Buy Climax, Sell Climax
Continuation = Price action is continuing from the prior day with a small or no gap
COY = Close Of Yesterday
CXT = kinda expanding triangle, a pullback in a CH, that takes out a minor LH/HL
Doji = a bar with no or small body compared to it’s range
DP = Double Top PullBack or Double Bottom Pullback
DT, DB = Double Top, two bars with the same or almost the same high or low
EB = Entry Bar
fBO = failed Breakout (E.g. fBO LOY = Failed Breakout of the Low of Yesterday which is a good setup for going long esp when it has a good signal bar)
fEB = failed Entry Bar, an Entry Bar, that fails to reach a common target
FF = Final Flag signifies a sudden loss of momentum, a horizontal/overlapped pattern after a trend, a breakout often fails and tries to reverse the trend
fH1, fH2 = Failed High 2 signifies 2 failed attempts by the Bulls to push price up. Very useful to confirm other patterns (e.g. fBO) or even trade it on its own..
fL1, fL2 = Failed Low 2 signifies 2 failed attempts by the Bears to push price down. Very very useful to confirm other patterns (e.g. fBO) or even trade it on its own..
FT = Follow Through Bar, a bar with the same color as the breakout bar
H1/L1 = One push pullback in a bull/bear move
H2/L2 = Two push pullback in a bull/bear move
HH = Higher High
HH MTR = Higher High Major Trend Reversal
HL = Higher Low
HL MTR = Higher Low Major Trend Reversal
HOY = High Of Yesterday
IB = Inside Bar, the high of the bar is at or below the high of the prior bar and the low is at or above the low of the prior bar
II = two consecutive Inside Bars
IOI = Inside Bar, Outside Bar and Inside Bar, a possible reversal pattern
LH = Lower High
LH MTR = Lower High Major Trend Reversal
LL = Lower Low
LL MTR = Lower Low Major Trend Reversal
lmt C = buy/sell the close of the Signal Bar with a lmt order (more aggressive entry compared to stop entry)
LOY = Low Of Yesterday
MC = Micro Channel, consecutive bars, without a pullback
mDT/mDB = micro Double Top/Bottom, two or three consecutive bars with the same high/low
Mid range = Open within the prior day’s range or very close to it
mTL= micro Trend Line
mW = micro Wedge, a wedge formed by only a couple of bars, especially Inside Bars
OB = Outside Bar, the high of the bar is at or above the high of the prior bar and the low is at or below the low of the prior bar
OIO = Outside Bar, Inside Bar and Outside Bar, a possible reversal pattern
OOD = Open Of the Day
OOW = Open Of the Week
OR = Opening Range
PW = Parabolic Wedge
RVB = Reversal Bar (also Pinbar)
SA = Sell Above the prior bar or swing high (if you know what you’re doing 😉
SB = Signal Bar
SE = Stop Entry 1 tick above/below the Signal Bar
T1B = Trend from the 1st bar of the day or so
TA = Trend Attempt, a strong breakout with a breakout bar closing beyond the breakout point
TB = Trend Bar
TCL = Trend Channel Line
TCLOS = Trend Channel Line OverShoot
TL = Trend Line
TRI = Triangle, a couple of swings with contracting range
TT = Trend Termination
W1P = 1st pullback after 1W
WfBO = multi-legged fBO of a TR
XT = Expanding Triangle
Thanks for your interest.
I enlarged the font, but kept it in the sidebar of the blog. Hope that it sticks out more now.
Hi
Am enjoying your content. I think it may be useful to put your abbreviations on their own page from the main menu.
Keep up the good work!